
Affiliate disclosure: This article contains affiliate links. If you purchase a product through one of these links, I may receive a small commission at no additional cost to you. Prices mentioned were available at the time of writing and may change.
Setting up delivery for an online store can be surprisingly confusing. There are plenty of instructions explaining how to connect Shopify to Australia Post or another courier, but very few explain how the physical shipping label ends up on the parcel.
This beginner-friendly guide explains the complete process, including how to generate a shipping label, what type of printer you need and where to purchase blank adhesive labels.
How the shipping label process works
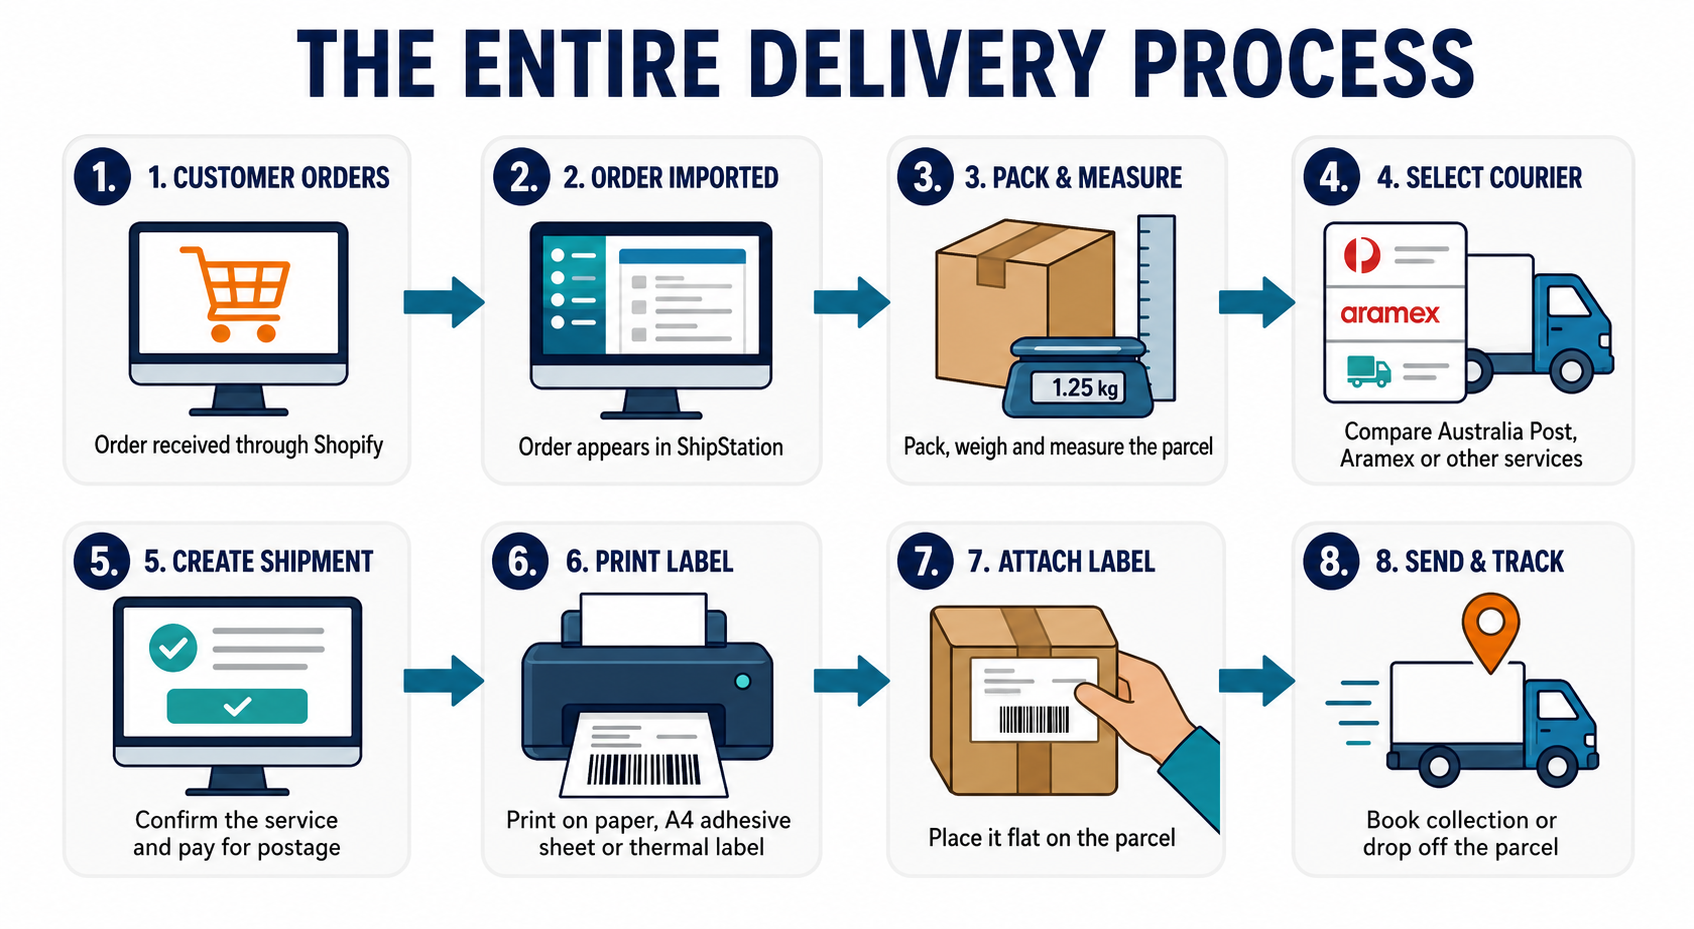
When a customer places an order through Shopify, the order is transferred to ShipStation. You then enter the final parcel weight and dimensions, select a courier and create the shipment.
Once the shipment has been created, ShipStation generates a digital shipping label containing:
- The customer's delivery address
- Your return address
- The selected courier service
- A tracking number
- The courier barcode
- Parcel-routing information
The shipping label is generated as a printable document. ShipStation does not send you a physical adhesive label. You must print the label yourself and attach it to the parcel.
The basic process is:
- A customer places an order through your online store.
- The order appears in ShipStation.
- You pack and weigh the completed parcel.
- You enter its weight and dimensions.
- You select the preferred courier service.
- You create and pay for the shipment.
- ShipStation generates the shipping label.
- You print the label.
- You attach it securely to the parcel.
- The parcel is collected or taken to the appropriate drop-off location.
Install ShipStation Connect
Windows users can install ShipStation Connect for Windows to connect ShipStation with their printer, scales, scanners and other shipping equipment.
Download and install ShipStation Connect on the computer used to process your orders.
ShipStation Connect allows you to print shipping labels directly from ShipStation without downloading and opening every label manually. Connected devices can also be shared with authorised users within your ShipStation organisation.
Because software download links and versions can change, it is worth checking that you are installing the most recent official version available from ShipStation.
Three ways to print your shipping labels
You do not necessarily need to purchase a dedicated label printer when starting an online store. There are three practical printing options, depending on your budget and the number of parcels you process.
Option 1: Use an ordinary printer and A4 paper
You can use an ordinary inkjet or laser printer to begin shipping orders.
The process is simple:
- Generate the shipping label in ShipStation.
- Print the label onto ordinary A4 paper.
- Cut around the printed label.
- Position it on the largest flat surface of the parcel.
- Secure it using clear packing tape.
Make sure the address and barcode are flat and clearly visible. Do not fold the label over the edge of the parcel or allow the barcode to wrinkle.
Avoid placing several overlapping pieces of tape across the barcode. Reflections and creases can make it more difficult for courier scanners to read.
Printing on ordinary paper is suitable when testing a new store or processing only a small number of orders. It is slower than using adhesive labels, but it allows you to start shipping without purchasing additional equipment.
Option 2: Use an ordinary printer with A4 adhesive sheets
The next option is to use A4 adhesive shipping-label sheets in your existing inkjet or laser printer.
These sheets commonly contain two large peel-and-stick labels on each A4 page. ShipStation prints the shipping label into one section, which you then peel from the backing and attach directly to the parcel.
At the time of writing, a pack of 100 sheets was approximately $68.87. Check the current product price and availability before ordering.
Before purchasing A4 adhesive labels, confirm:
- Whether the sheets suit inkjet printers, laser printers or both
- How many adhesive labels are included on each sheet
- The dimensions and position of each label
- Whether the sheet layout matches an available ShipStation print format
- Whether your printer supports adhesive label sheets
When printing, select an A4 two-label or half-page layout in ShipStation. Do not select the 4 × 6-inch thermal layout unless you are using a compatible thermal printer and label size.
It is a good idea to run your first test on ordinary A4 paper. Place the printed test page over an adhesive sheet and hold both pages up to a light. This will show whether the shipping label is positioned correctly before you use one of the adhesive sheets.
A4 adhesive sheets are suitable for businesses processing a smaller number of orders. As the number of daily shipments increases, thermal printing usually becomes faster and more economical.
Option 3: Purchase a dedicated thermal label printer
A dedicated thermal printer is the most practical long-term option for a growing online store.
A direct thermal printer:
- Prints onto heat-sensitive adhesive labels
- Does not require ink or toner
- Produces clear courier barcodes
- Prints one peel-and-stick label at a time
- Is faster than printing and cutting A4 paper
- Reduces paper and packing-tape usage
For standard courier labels, look for a printer capable of handling labels measuring approximately 100 × 150 mm, also advertised as 4 × 6-inch shipping labels.
Do not purchase a small household label maker intended for name labels, folders or storage containers. Courier labels require a wide-format thermal printer.
Recommended thermal label printers
Brother QL-1100
The Brother QL-1100 is a sensible mid-range option when the packing computer is located close to the printer.
It:
- Connects to a Windows or Mac computer by USB
- Prints labels up to approximately 103 mm wide
- Uses direct thermal printing
- Does not require ink or toner
- Includes an automatic cutter
- Can print full-size postage and courier labels
The Brother QL-1100 is generally suitable when one computer is being used to process and dispatch orders. Pricing varies between suppliers, but it may cost approximately $375.
Brother QL-1110NWB
The Brother QL-1110NWB provides the same wide-format thermal printing capability with additional connection options.
Depending on the device and configuration, it supports:
- USB
- Wi-Fi
- Ethernet
- Bluetooth
- Printing from compatible mobile devices
This model is more suitable when several computers or devices need access to the same printer. It is generally more expensive, with a recommended retail price of approximately $599, although current retailer pricing may vary.
For a small dispatch area with one Windows computer, the less expensive Brother QL-1100 will generally be sufficient.
Which adhesive labels fit these Brother printers?
The appropriate full-size Brother shipping label is the Brother DK-11247 Large Shipping Label.
These labels measure approximately:
103 × 164 mm
This size provides enough space for a standard full-size postage or courier label.
At the time of writing, one genuine roll containing approximately 180 labels was listed at around $53.95. Check the product listing for current quantities and pricing.
The printer normally includes a small starter roll, allowing you to install the printer and test your ShipStation layout before purchasing labels in bulk.
Compatible third-party DK-11247 rolls may also be available at a lower cost. However, adhesive strength, print quality and roll recognition can vary between manufacturers. Testing one roll before buying a bulk quantity is recommended.
Important label-size warning
The 62 × 100 mm labels may physically fit compatible Brother printers, but they are not the correct size for a standard 4 × 6-inch ShipStation courier label.
They are more appropriate for:
- Product labels
- Address labels
- Barcodes
- Storage labels
- Smaller custom labels
For full-size Australia Post, Aramex and other courier labels, use the larger DK-11247 format or another label stock measuring approximately 100 × 150 mm or larger.
How to set up the printer in ShipStation
After installing the printer and ShipStation Connect:
- Sign in to ShipStation.
- Open your printing or document settings.
- Select the printer that will be used for shipping labels.
- Choose the appropriate label layout.
- Confirm the paper or label dimensions.
- Print a test document.
- Check that the address and barcode are complete and clearly printed.
- Confirm that no part of the label has been cropped.
- Save the printer settings.
For the Brother DK-11247 roll, select the closest supported full-size shipping-label format. Check the preview carefully because the Brother label is slightly larger than the common 100 × 150 mm format.
Print one test label before creating a live shipment.
What you need to begin shipping
A basic order-packing station should contain:
- A computer with access to Shopify and ShipStation
- ShipStation Connect
- An ordinary printer or wide-format thermal label printer
- Compatible paper or adhesive labels
- A digital parcel scale
- A tape measure
- Shipping boxes or satchels
- Packing materials
- Strong packing tape
- A packing-tape dispenser
Always weigh and measure the parcel after it has been packed and sealed. The product weight alone does not include the box, tape and protective packaging.
Final recommendation for a new online store
If you are just starting and only expect a few weekly orders, use your existing printer with ordinary A4 paper or two-per-sheet adhesive labels.
Once order numbers increase, move to a wide-format thermal printer such as:
- Brother QL-1100 for USB printing from one primary computer
- Brother QL-1110NWB when wireless or network printing is required
Use Brother DK-11247 full-size shipping labels for standard courier labels.
If you order through Amazon, the printer and labels can generally be delivered reasonably quickly, depending on the seller, stock availability and your location.
Once the equipment is connected, the process becomes straightforward: pack the order, enter the parcel details, select the courier, create the shipment, print the label and attach it securely to the parcel.